DIY 6x6 Flip Album

Friday, June 30, 2017 No comments
I recently made this album using a kit of paper and doodads I received this spring via a subscription I have at Country Craft Creations.  I got the tutorial on you tube for making this album, and I'm including a walk through with all that info...some things are just better done through video...

Ribbon Flab

Wednesday, June 28, 2017 No comments
I've seen these out and about on the web lately, so I decided to give it a go.  My Mom's friend had given me a bag of goodies (trim and lace) she was getting rid of that was perfect for this project.  

I alternated trim and strips of fabric I ripped (about 1 inch).  I simply tied it to the top of a dowel.  I didn't do the exact number of stripe, but I did start with the white (which sits next to the blue).  
 For the blue I just glued some buttons and pearls onto a blue piece of fabric I had hot glued it to the top of the flag.  I did read when you hang flags like this the blue goes on the left (union first).  I also bought some star fabric I'm going to use for my next one.
 For the stripes that extend out of the blue I just hot glued them to the back.  Again, I'm not sure on my numbers, but I know it starts and ends with red.
 It was a super simple project, and I love how it turned out.

Statue of Liberty Pop

Monday, June 26, 2017 No comments
I actually made these Statue of Liberty pops to give out to some of my political friends last fall.  I usually do a little patriotic pass out during debate season.  I found these statue molds from a local cookie shop and bought some edible green glitter too.  
They don't 'recommend' you eat the glitter, but I've consumed it and lived to tell the story.  Once the molds were dried I got the whole thing wet with a paint brush and then sprinkled on the glitter.  That's all it takes to adhere.  
Quick and easy, and these little patriotic ladies may make an appearance again this July 4th.

Tea Party

Friday, June 23, 2017 No comments
 When I started teacher 16 years ago, I was a sixth grade teacher and the two teammates I started with are two of my closest friends even today.  We still work together in different capacities.  Mary is retired, but tutors at our school (a different one from where we began).  Sonia and I are both specialist together.  We moved together after our second year to a school closer to us.  She turned 50 this past spring and we decided to surprise her with a tea and some of the friends we collected along the way.
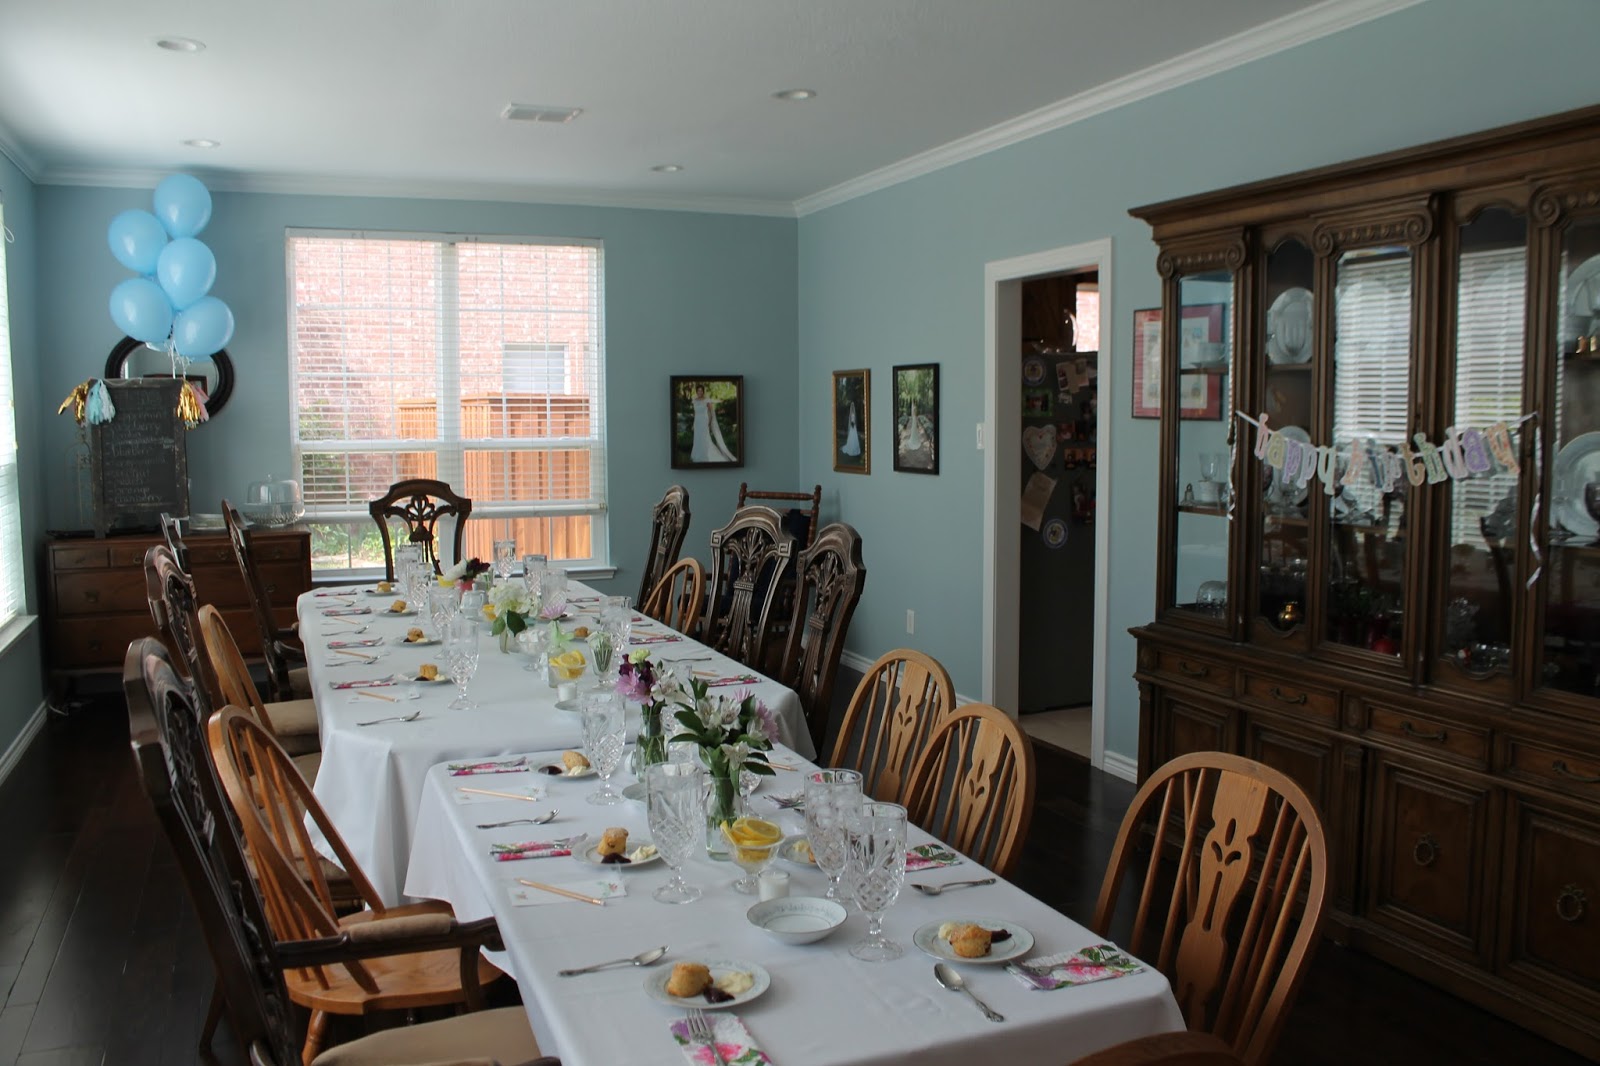
 I made a little birthday banner with scrap fabrics that reminded me of her.
 For a 'game' Mary pulled out more than ten different kinds of teas and we served different teas for all three courses and had them write down a guess each time on a card.  At the end, the people with the most correct answers got a 'prize.'  It created fun conversation regardless.  We served each person a different combination.
We lined the tables with milk, lemons, and sugar cubes.  We started out with scones, clotted cream, and jam on each plate.  We also went ahead and put some dishes in the middle of the table for used tea bags.  
 Mary had a collection of cups....which always reminds me I want to start doing this.  I don't drink teas, but (ironically) I've hosted quite a few now.
 For course number one, we served tomato soup and cheese straws.
 Course two was three different kinds of sandwiches and strawberries.
 Last up-sugar cookies, chocolate truffles, lemon cups, and petit fours.
 To get Sonia there, I had told her we wanted to take her to lunch at a new tea room near Mary's house.  I told her I made reservations at 2:30, so to arrive by 2:15 and we'd all drive together.  She was pretty shocked when she arrived to a table full of friends.
We ate, laughed, and ate some more.  A lot of the guest brought her their favorite teas, and we also had everyone sign the back of this little sign for her to take home as a moment.  
Just a few tips.  We plated everything but the soup in advance.  To keep the sandwiches from drying out we put a damp paper towel over each plate.  I put tags with each person's name on them on the cups so we could quickly dump out any left over tea, quick rinse, add a different tea bag, and then a new kind of tea.  It was a really fun way to get together and much easier than I thought with everything planted in advance!

Folio Albums

Wednesday, June 21, 2017 No comments

This is the year of the scrapbook(s) for me.  I'm making scrapbooks for most of my friends in one way or another for one holiday or another because I can.  These little folio albums I put together for two of my animal loving friends.  The idea is that they can print their pictures (finally-I'm so stressed (not really, but I could be) by the number of photos that will be lost b/c they only live on social media accounts-hello, does anyone remember myspace?).
I'm attaching a video walk through of the two albums (above, I think-if not-just go to my youtube channel).  Now.....on to regular programming.

Dinosaur Birthday Party

Monday, June 19, 2017 No comments
 I few months back I helped one of my pals host a 7th birthday party for her daughter.  She wanted dinosaurs.
I made these little egg dino invites (which I posted about previously).  The goal was as much DIY as possible.  
 The memories I have are the ones at home where my mom decorated the house and baked the cake.  Instead of ice cream we served pudding layers with oreos and topped with chocolate rocks and dinosaurs.  The kids loved these.
 I also made some games (via pinterest ideas).  Pin the horn on the triceratops.
 Feed the T-Rex.
 I put out bubbles and chalk (it was near Easter, so I found some shaped like eggs).
I also made a photo booth with props.  I put out a bunch of supplies so the kiddos could decorate a 'frame.'  The girls loved this most.  I used my little Polaroid to take pictures.  
 I also made some party hats using some from the dollar tree.  We set out some snacky foods and gave them fun dino names.  Dino eggs, dino bones, herbivore and carnivore treats etc.
 She even had her sons get a dino costume and one popped out mid party.  Side note, they had t-shirts made for each family member.  I made a seven-o-saurus for the birthday girl, then bro-a-saurus, dad-o-saurus, and mom-o-saurus wore their shirts.
 The last activity was a 'dinosaur' egg hut.  Her older brothers helped hide them.  I bought some shades of green eggs and a TON of dino fillers from Oriental Trading (dino erasers, gummies, stamps, stickers, finger puppets etc).  I put a different item in each color egg and initially told each kiddo to find one of each color egg, then let them go to town once we knew they had found one of each prize.  This also allowed me to tell the parents with kid allergies etc not to pick up any yellow eggs (the only on with a food item).
It was a hit, and I know she will have memories of this to last a lifetime.  

Cucumber Sandwiches

 I recently helped host a tea for a friend of mine.  When we were deciding the menu I knew she liked cucumber sandwiches, but in all my years....it's one thing I've never tried to tackle!  I did a lot of research.  I knew I didn't want it to be too bland.  I found this recipe that had a little bit of a kick and I really did like it.  I served it open faced because I felt like the sourdough was a good friend to the cucumber, but two pieces would have been a little gummy.
Cucumber Sandwiches
Ingredients:  1 8 oz pkg cream cheese, 1/2 c. mayonnaise, 1 pkg dry Italian seasoning mix, 1 cucumber (peeled and thinly sliced), 1 loaf of sour dough bread, fresh dill.
Instructions:  
I sliced the sour dough about 1/2 inc thick.  I even toasted it for about 5 minutes just so it wouldn't be so chewy.  It was, by no means, toasted, but it did make it a little less gummy.  Prior to toasting the bread I had mixed some room temperature cream cheese with 1/2 c. mayonnaise and one pkg of dry Italian salad dressing mix.  I put that in the fridge to chill for a few hours.  I then spread that on my toasted bread and then added three pieces of peeled and thinly sliced cucumber.  I sprinkled the whole thing with some dried dill.

Sea Shell Checkboard

Friday, June 16, 2017 No comments
 A lot of beach vacations end with a bag of shells for me.  I recently brought a bunch of beach themed crafts to GMT.  This is one of them...it's super simple, but a fun way to use some of those shells.
I bought a 1 1/2 foot board and had the home improvement store cut it down to squares.  I painted it white and then I took a regular kitchen sponge and figured out what size square would be the right one for 8x8.  In this case, it ended up being about 1 1/2 inch.  I took some blue paint and sponge pressed it down.  I liked the 'holes' left from the sponge stamp, but you can go back and paint it to be a solid square.  Afterwards I added two different kinds of shells I have.  You could also just paint the same shell two different colors.....or use bottle caps or sea glass....whatever is around.

USA Banner

Wednesday, June 14, 2017 No comments
Last fall I FINALLY put together a craft room.  Up until that point I had a craft HOUSE and even though I'm really good about finishing most projects I plan....I do plan a TON.....so I uncovered some things I never crafted included some wooden letters.  
I got these at Hobby Lobby and I'm sure it was a week they were 30 percent off (so-70 cents for each two).  
I just gave them a quick coat of acrylic paint, and then I glued these on to some red twine (I took some scraps of fabric to sandwich the twine with so that it makes them hold to the string a little stronger.  I also added some stars I made with my embroidery machine, but you could cut out sparkle foam, and then I tied on some ribbons (I saw something similar on Etsy).  The star ribbon I actually bought at the dollar tree last summer, so.....another something I was able to use in my stash of stuff!

Colored Pasta

Monday, June 12, 2017 No comments
I made this pasta last year for July 4th.  I used a simple salad recipe I serve a lot with grilled food, but I grabbed some spiral pasta and I divided it into thirds.
I put one third in the bowl with the veggies, and then I added about 20 drops of red dye to one third.  I took a spoon and stirred and tossed it around until it was dyed red.  You can add more color to make it even darker, it's all up to you.  Once it's dyed, put it in a colander and run water over it until it stops dripping red below.  Make sure you get the excess dye off so that you don't end up with a purple pasta.
Repeat with the last third and blue dye.  Toss all the salad together.  If you rinse well enough, each noodle should hold it's color really well, even with dressing added.

Exploding Box Scrapbook

Friday, June 09, 2017 No comments
I've been wanting to make one of these little exploding box albums for awhile now, and I finally bit the bullet.  There are tutorials for making these from the ground up, but they also sell the 'shells' at craft stores.  I bought this one at Michael's.  
 It was about 6 bucks before I used a coupon.
 I just covered it with some scrapbook papers I had in my house.  I also decorated each page, added some pockets and flips etc.
Eventually I'll gift this to someone to add pictures to.  I love how it folds up, and  you can still store little souvenirs etc inside=these would make great weekend trip albums.  I think I'll make my second one I snagged with a Thanksgiving theme and I might have my family write some 'what I'm thankful for...' notes to slide inside.