Penny Vase

Friday, February 27, 2015 1 comment
 I made this a few months back for Good Morning Texas at the request of one of the host.  She was it in a magazine, so...here's my version.
I got a vase for a buck and sprayed it brown (because the pennies have a little bit of space between them).
 ...and then...I just glued a bunch of pennies-front and back at all different directions and I called it a day.  Easy enough!
 I filled it with wheat just because I can.

Mail A Pot O' Gold

Thursday, February 26, 2015 No comments
 This year, one of my New Year's resolutions was to send a surprise through the mail each month.  I sent a card in January to a friend I've taken for granted lately, a package in February, and now I'm ready for March.  This little guy is going to be shipped out at the first of March to a friend of mine who I think will appreciate the surprise.
Lately, I've really been into making cards..or rather, I've been into WANTING to make cards, but I haven't had the time or supplies to get too many put together, so this is my third little card.  Apparently, I'm also into MINI cards...
 For this card I used some washi tape, rhinestones, baker's twine, and these felt clovers (from the button section in JoAnn's crafts).
 Simple, but cute....and it has inspired me to put together some larger versions of these guys, but this one had to fit in this little box...
I felled a little plastic box with some green shred and these little gold treasure chocolates.  I slipped the card inside and then it's off to the mail to find it's way East to a friendship I treasure....see what I did there? ;o)


DIY Lamp Shades

Tuesday, February 24, 2015 No comments
 I recently was tasked with trying to make some lamp shades with a limited budget.  I'm used to a limited budget.  I check out some shades I like at different stores in the area known for decor and then I went to work.
I grabbed some shades for a buck at the local thrift store....the less 'curve' the easier it is to attach your fabric.
You can use adhesive spray, or a good ol' glue gun.  I measured the shade using a newspaper (wrapped it around, creased the edges, and then I knew how much fabric to cut.   I bought some fabric I liked and got to work...
 I found some ribbon for half price to make the edges (glue gun) and a flower in the hair bow section of the craft store.
I used a base to a lamp I sprayed with water/mirror spray.  That tutorial lives here.
I also made the burlap one (at the top) and instead of a trim I just glued some 'ruffle's from scraps of fabric.

Macho Nachos

Monday, February 23, 2015 1 comment
I don't know why I never thought about this, but chili is actually good on tortilla chips.  I saw the recipe for 'macho' nachos....which basically=more meat at I'llwashyoudry.  Very easy, and yummy.
Recipe:  Lay 4 handfulls of chip on a baking tray.  Top with half a can of chili, 1 1/2 c of mexican cheese.  Repeat layer.  Bake for 5-10 minutes at 400 degrees (untill cheese is melted).  Top with olives, jalapenos, tomatoes, sour cream, green onions, salsa, etc.  Serve 'em up.

Peter Rabbit Baby Shower

Friday, February 20, 2015 No comments
 I recently was a part of a group throwing a shower at work for one of our SPED teachers, Autumn.  She and her husband had a long journey before she was able to get pregnant, so it was a much anticipated pregnancy, and much celebrated on our staff.  She's been healthy each step of the way, and enjoying planning all the pieces that go into being a mama.  Her nursery theme is a nod to one of her childhood favorites Peter Rabbit.  We decided to do a shower in the same theme.  One of the ESL teachers is a whiz with invitations and put together a cute invitation, the guest names were printed on bunnies and attached with ribbons. 
 She also made some precious bunny banners to display.  I bought "Guess How Much I Love You."  Each member of our staff signed the inside cover and we gave this to Autumn for baby Soren's book collection. 
 The group hosting was given the assignment of bringing anything'garden' so little pots, berry baskets, stuffed bunnies, and books became our décor. 
 We put our food offerings in terra cotta pot bases. 
 I have a ton of little garden 'stuff' I used once before I've saved and pulled out for Easter etc....and so our muffins hitched a ride in this mini wheel barrow. 
 I've used this little planting caddy for years for just such an occasion. 
 For dessert one of the teachers made dirt.  We served lemonade in mason jars, and bagged up trail mix in some decorated brown bags. 
 There is no better reason to get together than the upcoming birth of a little miracle baby.  Looking forward to watching him grow!

Hello, Dolly Bars

Thursday, February 19, 2015 No comments
I needed a quick dessert for a party recently.  I also found myself with an abundance of pecans on my hands, which is never a bad thing, but....I did need to start using them before they were classified as vintage.  I put together these bars and it was a big hit.  The original recipe came from homestyle.
Hello Dolly Bars
Ingredients:  1 1/2 c. finely crushed graham crackers (one sleeve-about 9 graham crackers), 2 c. of milk chocolate chips, 1 1/2 c. of shredded coconut, 1 1/2 c. of chopped pecans (or walnuts), 14 oz. can of sweetened condensed milk, 1/2 cup of butter (melted)
Instructions:  

1.  Pour melted butter into an 11x7 pan, add crushed graham crackers in pan, and mix well with melted butter to form a crust.  Press into the bottom of the pan. 
2.   Layer on top of  crust chocolate chips, coconut,  and pecans.3.  Evenly pour sweetened condensed milk over everything.4.  Bake in oven for 25 to 30 minutes at 350 (top should be light brown).5.  Let cool in pan for at least an hour so the chocolate can harden, cut into bars.

Strawberry Salad

Wednesday, February 18, 2015 No comments
This is a recipe from Trisha Yearwood's cookbook and it's probably my favorite new salad that I've tried out in YEARS.  I think it's the ramons....I don't know why, but I hear those little jewels on a salad.  It's easy, fresh, and if you accidentally eat some of that spinach with all the other fun stuff, it's also healthy....who knew?
Strawberry Salad
Ingredients:  1 pkg ramen noodles (crushed, discard the flavor package), 1/4 c. sunflower seeds, 1/4 c. sliced almonds, 1/4 c. butter (melted-you can use cooking spray for healthier option), 5 oz bag of baby spinach, 1 pint of strawberries (hulled and sliced thin), 1 c. grated Parmesan cheese, 3/4 c. sugar (or sugar subst), 1/2 c. red wine vinegar, 2 garlic cloves (minched), 1/2 t. salt, 1/2 t. paprika, 3/4 c. veg oil (or olive oil), grilled chicken (optional)
Instructions:  
1.  Mix the noodles, nuts, and melted butter.  Place on a baking sheet and toast at 350 (stir a few times) for 10 minutes.  Let cool.
2.  Mix lettuce, strawberries, and cheese.
3.  Dissolve sugar in the vinegar.  Add garlic, salt, paprika, and oil.  Mix and store in the fridge until serving.
To serve, toss spinach with dressing and top with noodle and nut mix.

Mardi Gras Beads

Tuesday, February 17, 2015 No comments
I'm headed to Good Morning, Texas today to do two different segments-beads and food.  The task given to be for the beads was to revamp some traditional beads.  The second segment is food.  I'll post both later to facebook.
I found these glass beads at Michael's.  Full price they are 99 cents.  They come in different sizes, and it took me 3 strands (so three dollars), plus some ribbon, fastenings, and wire.
I twisted the wire around one of these round jewelry jump rings.  Then I looped a piece of ribbon through it.
On the second side I put one of these larger findings.  This is what I use to tie a ribbon to to 'open' and 'close' my necklace.  I bought all of these at Hobby Lobby awhile ago-they have them half off quite frequently, but you can find them in any craft store in the jewelry section.
I also made a 'chunky' necklace out of traditional beads.  I took six strands of the cheap beads you snag at parades.
 I used some wire to tie them all together.
I snipped the ends.
 I braided this loosely and then used another wire to hold the loose ends together.
To both sides I added a jump hoop again.
I strung ribbon through both sides (and hot glued a fold to hold onto the hoops) and then this particular necklace ties in the back.
Last in the bead line up is this bracelet, also using traditional beads from parades.  I posted that tutorial on Monday.

Mardi Gras Bead Bracelet

Monday, February 16, 2015 No comments
 I'm taking 6 Mardi Gras themed crafts to Good Morning, Texas tomorrow.  The first three crafts were 'bead' related. Here's one idea for a festive bracelet/or...a way to recycle those beads.    I saw the idea  at peaches first.  It's so much easier than I even anticipated.  I got some beads, some of these bracelets from Hobby Lobby's jewelry making section (2 dollars for three at full price-I used a coupon).
 I glued the beads around the outside of the bracelet.  I then took some ribbon (a buck) and wrapped it between the spaces between each bead.
 I tied a bow with both of the dangling ends.
 I then added some gold beads to some wire (they also sell gold wire) and I wrapped the wire around the ribbon putting two or three beads on each time I wrapped it around.
How cute would this be with a little stack of mix and match bracelets? This cost me well under a dollar a bracelet.

Heart Cross Stitch Shirt

Sunday, February 15, 2015 No comments
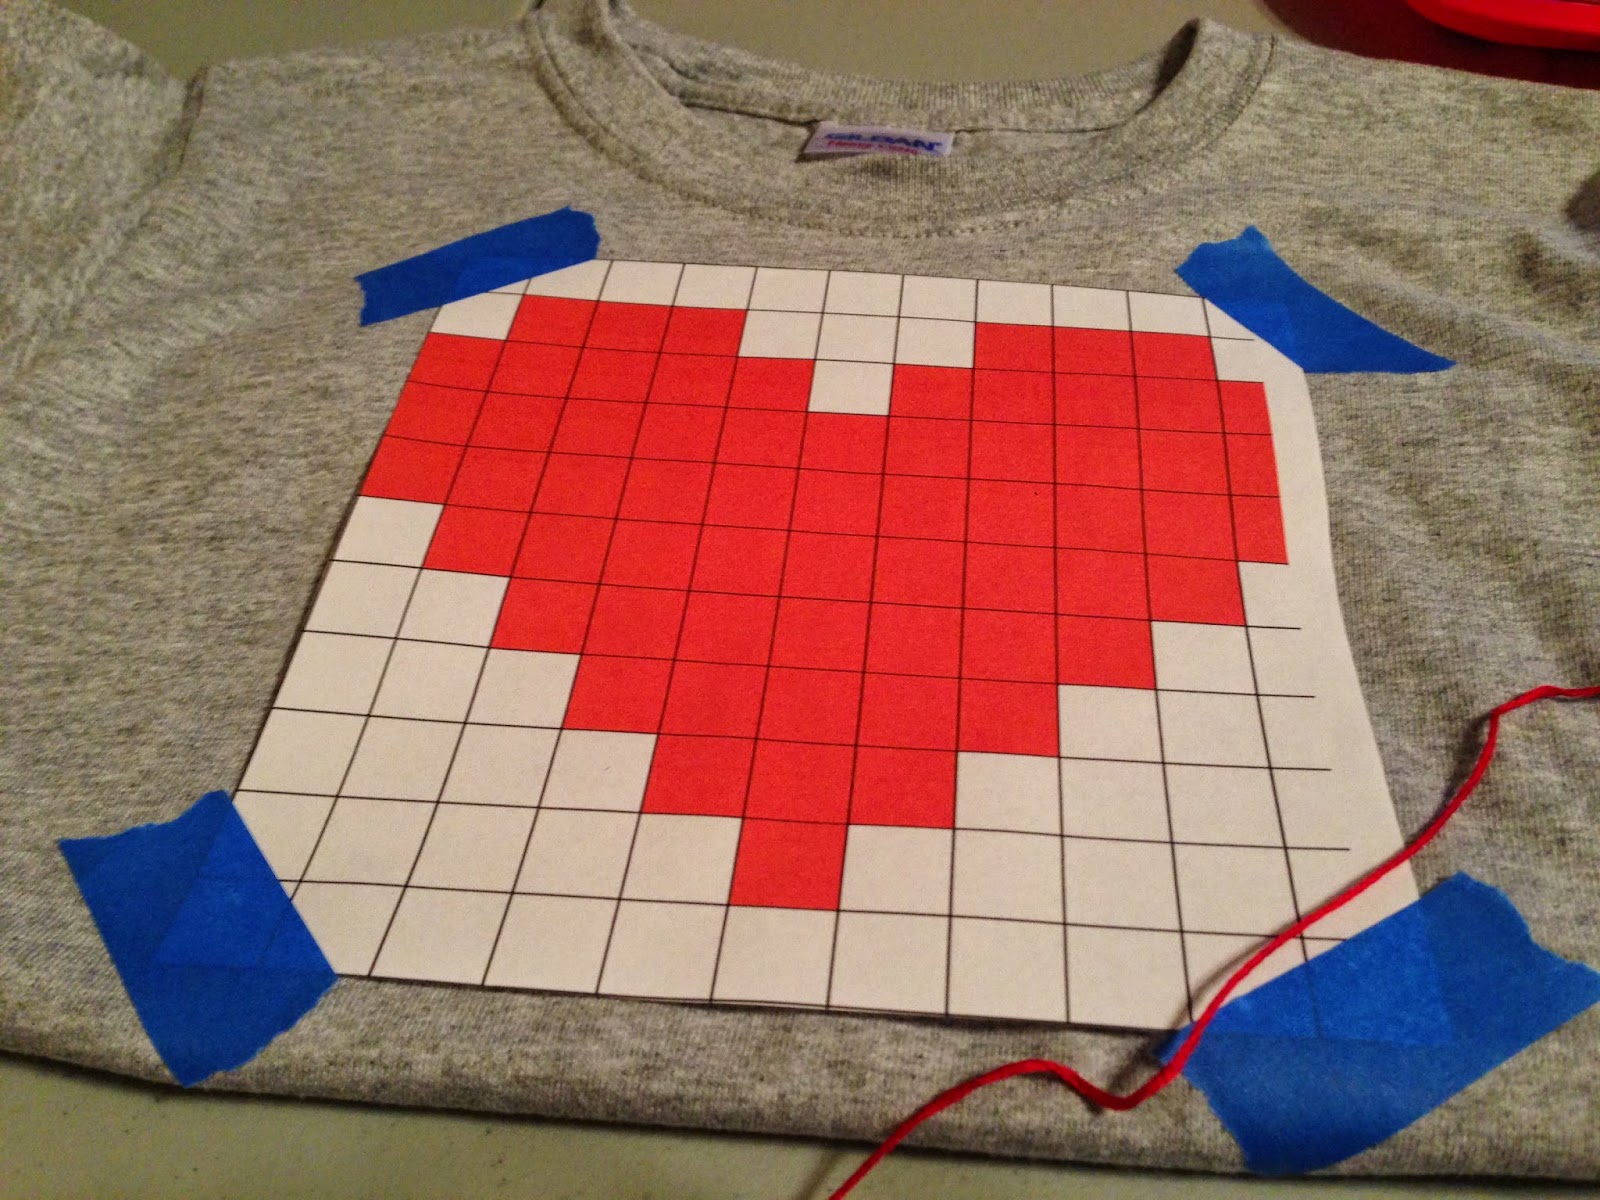
 I did a post tape for GMT recently with some embroidery projects.  It should be airing sometime in the next week or so, but....here's a sneak peak.  I made this heart shirt with a few simple steps.  I found the original tutorial with a free print out for a pattern to follow at uber.  I printed one out and taped it to a shirt (you could also hoop it).
 Another idea,  if you want your stitches to be really stable is adding a stablizer to your hopped set up.  I used red embroidery thread (all six strings b/c I really wanted it to pop) and then I  started created cross stitches following the pattern from corner to corner.
 When I was finished, I tied off my thread and then to get the paper off the shirt I sprayed it with water so the paper would become flimsy and peel right off.
Less than 3 dollars-not too shabby.  You know how when you buy clothes and they have little 'inspection number' stickers on them.  Most of mine come with personalized drool and a handful of dog hair.