Gingerbread Men Cinnamon Soap

Friday, November 29, 2013 No comments
 Last Christmas I had a whole list of things I was going to make each person for Christmas.....right up until I found this little silicon Gingerbread man tray at Hobby Lobby.  I stumbled across soap using this same pan on Etsy and all those other ideas went out the window....where they sat until this year.  BUT.....last year was the year of cinnamon soaps.  I grabbed some soap squares at the craft stores as well. 
 I used dye (also found in the same section, though you can use regular food dye.  I've never had any problems with this dying my hands, but if you want to be double triple sure, use the dye found in the soap section).  I also used a cinnamon scent.  Again, I used about 1/8 of a teaspoon per 6 men (about 9 of the squares of soaps melted).  I just used cinnamon flavoring from the kitchen supply spice section, but they also sell scents in the soap aisle of craft stores. 
 I followed the instructions to melt down the soap and added the scent and coloring and then poured it into the molds.  It only takes about ten minutes to harden.  I like using the silicon, as opposed to metal because it is much easier to pop out and keep it's form. 
 I bought a little tray at the dollar store to give to one of my friends with a herd of grand kiddos.  I thought this would be fun for them when they come to visit their Grandmother at Christmas. 
 I also packaged these (wrapped in Saran with a little dot on the back with what they were) with mints for the administrative assistants at work. 
 ...and a few more individual for coworkers. 
...and now, I'm off to make all those things I was going to make last year until I became a one-woman- gingerbread-man-cinnamon-soap-factory-making machine....

Happy Thanksgiving!

Thursday, November 28, 2013 No comments
Hoping your heart and  life is filled with many reasons for gratitude and opportunities to give thanks today!  

Cookie Exchange 2012

Wednesday, November 27, 2013 No comments
Every year at work (the past three years at least) we've had a cookie exchange.  There are a lot of us, so instead of doing the traditional-bring x number of cookies gig-I tried to make it a recipe exchange (based on a cookie exchange they did years before I was at the school).  So many of the ladies I work with like cooking and trying out new recipes, so it's a fun way to try out 20+ new cookie recipes without having to bake a whole batch. We each place two cookies in a bag and attach the recipe and then go home and sample.  I've posted a few of the recipes I loved, and will continue to post a few more to die for, but here are two great ones from the exchange....
Gingerdoodles (or Snickersnaps) from Lauren...(original recipe found on bakergirl via A Year of Cookies)

Snickerdoodle Dough
Ingredients:  1/2 c.shortening,3/4 c.sugar,1 egg, 1 T. vanilla, 1 1/2 c. flour, 1/2 t. baking soda, 1/4 t. salt, 1 t. cream of tartar, 1 T cinnamon + 3 T. sugar for rolling cookies in
Instructions:  Cream together shortening and sugar, add egg and vanilla and mix well. Add flour, baking soda, salt, and cream of tartar-mix and combine. Dough will becrumbly, but will come together when rolled into balls. Combine cin. and 3 T of sugar in bowl and set aside for rolling dough in. 
Gingersnap Dough
Ingredients:  3/4 c. shortening, 1 c.  sugar, 1/4 c. molasses, 1 egg, 2 c. flour, 2 t. baking soda, 1/4 t salt, 1 t. cinnamon, 1 t. cloves, 1 t. ginger, 1/4 c. sugar for rolling cookies in
Instructions:  Cream together shortening and sugar, add molasses and egg and continue beating. Add flour, baking soda, salt, cinnamon, cloves, and ginger and mix until combined.  Put 1/4 cup sugar in a small bowl and set aside for rolling dough in.
Combining the Cookies:  Preheat oven to 350°, grease baking sheets with no-stick cooking spray and set aside.
Roll a small amount of gingersnap dough into a ball and toss in granulated sugar. Roll a small amount of snickerdoodle dough in a ball and toss in cinnamon-sugar.
Place both doughs together and gently roll or squeeze together (it worked best if I kneaded the snickerdoodle dough in my hand a few times before rolling both doughs together since it's a  thicker consistency).
Place on baking sheets and bake for 9-11 minutes. Remove from oven and allow to cool on baking sheets for 2 minutes before moving to cooling racks.
Next up...Heather's Coconut Pecan Cookies

Ingredients:  1 c. brown sugar, 1 c. sugar, 1 c. butter (softened), 2 eggs, 1 t. vanilla, 1 1/2 c. flour, 1 t. salt, 1 t. baking soda, 1 1/2 c. uncooked oats, 2 c. coconut, 1 c. nuts (chopped)
Instructions:  Cream butter and sugar.  Beat in eggs and vanilla.  Sift dry ingredients and add everything else. Chill and drop onto greased cookie sheet and bake 9 min at 350.  

Cookies: Sugar Cookie Gift Pack

Tuesday, November 26, 2013 No comments
 My friend Amber gave me this cute gift last year, and it was right up my alley.  How cute?  A little picked oven mitt filled with sugar cookies, and tied all together with a spatula and cookie cutter to finish it off. 
I'm the fan of the sugar cookie, and I hearted this idea, so I had to share.  :O)  It's fun to have crafy friends!

Cookies: Gingerbread Sandwiches

Monday, November 25, 2013 No comments
 I do heart a good gingerbread project.  I've paid ode to the little guy over...and over again.  I have so many projects, I had to create my own label, so when I saw these cookies last year on katrina's blog I had to try them out.  For the gingerbread, I actually found a tube thanks to my pal Heather in the grocery store.  It really was delicious, but I also have a recipe that is really good for when I'm not feeling so lazy.  Here it is, they are a soft version.  Once you bake them up, just 'ice' one side with marshmallow fluff, and the other with melted chocolate (I just nuked some milk chocolate chips in the microwave for a minute and stirred until it was melted). 
 I pressed the two sides together. 
 Instead of the traditional royal icing (lazy hit again) I melted white chocolate in a ziplock baggie, snipped the edge and used a heart sprinkle I had in my vast sprinkle collection.  I know, I know...normal people don't have collections of sprinkles, but on lazy cookie baking days....I'm glad for this little 'problem' of mine!

Letter to Santa Free Template

Sunday, November 24, 2013 No comments
I'm putting together a few things for a Santa Party...I made these templates for writing Santa a letter.  You can download it for free here.  Stay tuned, lots more Santa details to come.  :O)

Cookie Exchange Kit

Friday, November 22, 2013 1 comment
 I decided last year that this year I was going to have friends over for a cookie decorating/exchange party.  I do this on a large scale at work, but I wanted to do this on  a small scale.  I'll post  more about it after the fact, but these are the 'kits' I've put together for each guest.  I wanted to keep it small b/c my kitchen is a galley, and there is only so much baking I can do.  I found the cookie tins at Hobby Lobby and went from there.  I put all the goodies in the tin, and I'll be adding a cute ribbon and this will second as my pals' Christmas gifts as well.
For the innards...
I made these aprons over the summer.  I wanted them to match the tins.  I went back and fourth with monogramming, but since I wasn't sure who all might enjoy coming....I decided to keep it more basic.  Here is the tutorial for putting these aprons together.  
 I found these cookie cutters (also at Hobby Lobby)...
 I also bought these little spatulas for smoothing icing (found them online, but have since seen these at super centers).
 I printed off free recipe cards, made these little clips, but I also attached recipe cards I made with the sugar cookie/icing recipe I used for the exchange.
 I found these tea towels at Sure la Table.  They have recipes for gingerbread.  I was going to make pot holders, but....found and fell in love with these instead.
 Everything fit snuggling into the tins that will double as a way to carry home the cookies we exchange/decorate.

Happy Birthday, Jesus Cake In-The-Mail

Thursday, November 21, 2013 No comments
I love everything about Christmas, but sometimes the idea behind the festivities is lost in the trees and reindeer.  I've seen the birthday cakes for Jesus popping up over the years, and I love this reminder being added to Christmas dinner.  My cousins little girl, Blythe is always very concerned everyone is able to celebrate a birthday with cake.  I'm sure it has nothing to do with the fact that she knows this also means she will get a slice.  I decided it was time to start that tradition in her life with a birthday cake for Jesus.  I've put most of the supplies in a box to mail along with their gifts.  Sprinkles, icing, cake mix, and a candle.  I think she can do the rest!

Pinwheel Princess Bow

Wednesday, November 20, 2013 No comments
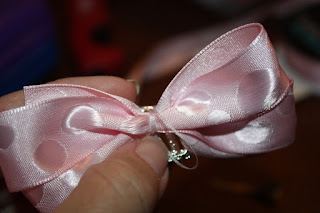
 I've made many a bow in the last few years as my friends started producing baby girls.  I decided to explore the cheerleaderish type bow.  This little pink mess is a pinwheel bow.  For the center I used these little crown buttons I found at Hobby Lobby.
All you need is ribbon (I used some that is about 3/4 inch thing), a thinner/matching piece for the center (if you aren't using a button, you tie a little knot and either glue it down or sew it down).  Wire/thread or glue for the middle to hold it together, and a match or fire to heat the edges of the ribbon so it won't fray, scissors, and glue.
 I decided on the side I wanted it to be and just took my ribbon, left a tail the size of the loop, and went back...
 ...and forth (to loops here)...
 ...and back and forth again so you now have two loops on each side, and two tails.  I overlapped it by about 2/3 of the ribbon so my pinwheel wouldn't be too wide.  You are actually looking at what is going to be the back of the bow here (the tails will be on the front).
 Pinch it in the middle (the tails should still be facing the back)....
 ...then accordion fold each side back up towards the pinched center.
 At this point you can tie it with wire, sew it (like I did), or glue it.
 I sewed the crown onto the front.  You could tie a knot in your thinner piece of ribbon, then glue it to the front, and wrap the ends around the back, overlapping your clip.
 Since I did a different center, I used my ribbon, slide it between the back of my alligator clip, glued it down, and wrapped it up to meet my crown at the front...
 Glued down...
 ...glued over the top towards the crown...
 ...ready to clip...
 I used the flame to sheer the edges of the ribbon tails so they won't fray....ready for a princess' head.